
FAQs
Once you’ve downloaded JDownloader (for free from this same site), then it’s time to install this comprehensive direct download manager. This guide will help you to get everything done properly.
-
Download and install JDownloader
Download JDownloader from http://jdownloader.com, open the installer and select where you want to copy all the files needed for the program to work (i.e., the default folder or the one you prefer).
-
File association and shortcuts
Click Next and the license terms will show. After that, you will be able to create file associations between JDownloader and downloadable content (.dlc) files (among others supported) or put a shortcut on the desktop and/or Windows Start menu.
If Java is not installed on your computer, you’ll be prompted to do so, as it’s a necessary component for JDownloader to work.

-
Language
You can chose the language to use with JDownloader and where the downloaded files will be stored (“Download directory”).
By default, the directory will be C:\User\[user_name]\Downloads, but it’s easy to change it by pressing Select.
-
FlashGot add-on (optional)
The next step is optional, and it’s about installing FlashGot, and add-on to integrate JDownloader with Firefox. This way, whenever you are surfing the web, you will be able to use a button to automatically add all the downloadable content on any given site to JDownloader.
-
JDownloader update
When the installation ends, it’s always a good idea to update JDownloader. It will only take a few minutes, and after that you will have the last version of JDownloader.
Now you’re done! Enjoy and have fun downloading everything you want for free with JDownloader.

FAQs
If you spend a few minutes setting up JDownloader properly, you’ll be able to speed up this popular download manager. The following guide will give you all the tools for faster downloading with JDownloader.
Installing and updating JDownloader
First, if you haven’t already installed this program, you can download JDownloader for free from this website and follow these steps to install it.
Then, just open the program and select the option to check for updates. Although this is an automatic process, it never hurts to do it by hand from time to time, as JDownloader is continuously improving and adding new components which provide faster downloads and more stability.
JDownloader Settings
Now it’s time to go to the Settings tab. There you’ll find the Basic Settings of JDownloader.
In “General” you can configure the way the updates are searched for and applied, alter the behavior when grabbing links and adding them to the download list or simply install FlashGot, an add-on to use JDownloader with Firefox seamlessly.

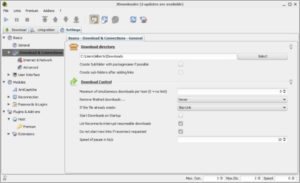
Meanwhile, “Download and Connections” allows you to choose the folder where the downloads will be stored, as well as the number of simultaneous tasks to be carried out (by default, the value “0” means that no limits will be applied) or the speed to be used when the pause mode is active. Default settings are usually recommended in order to download as fast as possible, but if something isn’t working properly, then try to tweak them.
Finally, in “User Interface” you can change the language, the skin or just customize the toolbar, amongst other things.
JDownloader modules
When it comes to set up JDownloader, this is one of the most comprehensive sections. In the one hand, with AntiCaptcha it’s easy to avoid the verification codes of most of the file hosting services on the Internet, as the program is able to decode them by its own in most cases.

In the other hand, Reconnection give us the choice to introduce several parameters to avoid troubles with the Internet connection, so there will be no need to restart a download if case of service interruption, while Passwords & Logins automatically adds all the passwords ever used to download from a particular server: a pretty useful tool.
Plugins & Add-ons
The setup of JDownloader ends with the Plugins & Add-ons menu. Here is where we can insert the details of our premium account (if we are subscribed to any service of this kind, in order to unlock restrictions and waiting times), or just configure other valuable integrated tools.

I.e., FlashGot for Firefox is used to integrate JDownloader in this web browser directly, while HJSplit and JD Unrar eliminate the need of using an external program to decompress any downloaded file.
Besides, if we want to customize the notifications that JDownloader displays, it’s very easy to do so in JD Light Tray.
Once the setup of JDownloader is completed, just restart the program and all the changes will be applied, as simple as that.
FAQs
If you want to download files with JDownloader, the first thing you need to do is specify the folder where they will be stored.
To do so, just go to the Settings tab and select “Downloads and Connection”. There you will be able to modify it. Then, JDownloader will ask you to insert a link or URL in order to add a download to its list.
Once you have copied the links, the link grabber of JDownloader will manage them automatically, checking its availability. If they are still online, just click the option “Continue with all” or individually add only those you want to download. Otherwise, you can also clear the list and discard them all.
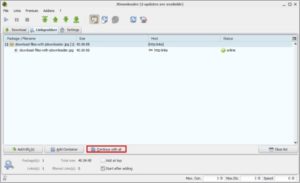
Now, the selected files will be added to the Download tab, where you will be able to arrange them according to their priority, as well as just pause or resume the tasks whenever you want.
When the download is finished, select it and with a right click you will open the folder where it has been stored. As simple as that.
If you need further instructions to use JDownloader, take a look at our set up guide.
